When I first started carving eraser stamps early this year (2012), I knew only ONE other person locally (Lorra of Stars For Dreams), who was also doing the same thing. In the last few months though, crafting, and stamp carving especially, has been the trendy thing to do among twenty- and thirty-somethings in Manila (along with calligraphy and washi tape!). The DIY/handmade/crafting movement has been going strong for the last few years internationally, thanks to Etsy, and Manila has started to catch on. Crafting is not just for kids and little old lolas anymore!
 Some of my rubber and eraser stamps.
I’ve sporadically been posting my eraser stamps on Instagram over the past few months and I’ve always gotten questions about where I get my tools and materials, so I thought of writing a post to answer all these. Then I thought, why not throw in a tutorial as well? Eraser stamp carving is pretty straightforward and I see people plunging into it immediately without a need for a tutorial, but in the course of carving my stamps, I’ve discovered some tips and tricks to make stamp-carving a little easier and more enjoyable, and I thought I’d share them with you.
This coffee cup stamp is the stamp I’ll be demonstrating in this tutorial.

Wedgienet’s Eraser Stamp Carving Tutorial
Contents at a glance
Tools you will need
A note on materials
I. Designing your stamp
II. Transferring your image
III. Defining your outlines
IV. Carving
V. Checking for artifacts
VI. Finished stamp
Tips for better stamp-carving control
FAQs
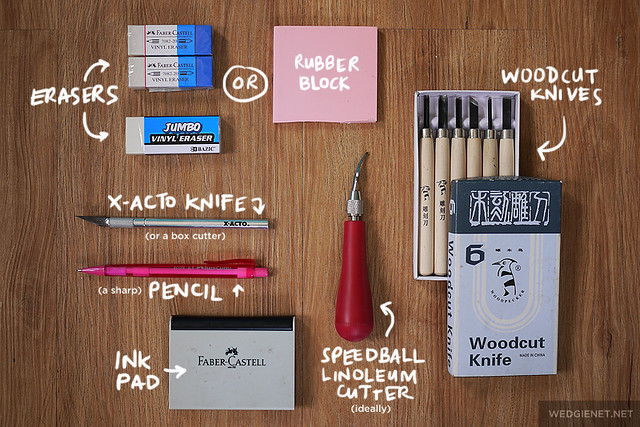
Tools you will need for eraser stamp carving
A note on materials
Carving tools

These are the V- and U- shaped woodcutting tools, named for the shape of their tips. I got mine which came with four other tool tips in a set from National Bookstore, but these two tips are the only ones I use.

I also have a Speedball Linoleum Cutter, or a linocutter for short. I bought this on a trip to the US. It’s a tool that comes with an assortment of carving tips that can be stored in its body. I only use the smallest tip though, the liner #1. It allows you to carve fine lines and detail in your stamps. If you don’t have a linocutter, a regular V- shaped woodcutting tool will be just fine, as long as the stamps you’ll be making aren’t too small or too detailed.
Erasers and rubber blocks
You can’t just buy any regular eraser and think it will work well for carving– not all erasers were made for carving. Some are too soft or are gritty, and will crumble when carved, and some are too plastic-y and will tear off and splinter. Your best bet will be a firm vinyl eraser– my current preferred brand of erasers for stamp carving is by Faber-Castell as it carves neatly and firmly.

One end of the eraser is blue (supposedly to erase ink marks– or is that just a schoolyard urban legend?) and is un-carveable (it’s gritty and crumbly) so I just chop it off and discard. I have a small pile of blue eraser ends waiting for me to figure out their purpose in life, someday.
I also use a rubber carving block by Speedball. It’s called Speedball Speedy Carve and it looks like this. It’s peeeenk!
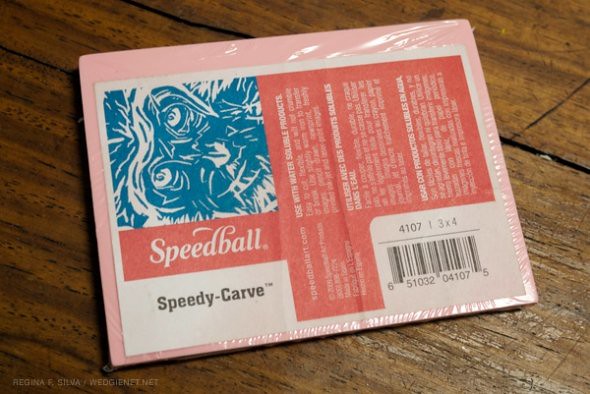
I got this in the US, though. I haven’t seen or tried any good-quality carving blocks locally, sorry. The Faber-Castell eraser is a really good (albeit small) alternative though; it carves just as well as the Speedy-Carve. For this tutorial, I’ll be carving with a Faber-Castell vinyl eraser.
Let’s get started!
I. Designing your stamp
I like to draw my design on to paper first, to transfer on to the stamp. Some people draw their designs directly on the stamp, which is fine, but admittedly I sometimes have dumb blonde moments (even though I’m dark-haired and Asian) where I skip the paper drawing because I’m impatient. I’ll draw/write directly on the stamp, spend an hour carving it out, and stamp it on paper… only to realize that the design I so painstakingly carved reads “OLLEH” because I forgot that I’ll be transferring a MIRROR image. *facepalm* It really makes me feel like an idiot :(

First, trace the shape of your eraser, on a sheet of paper, preferably near the corner of the page (so it’s easier to transfer, which we’ll get to in a later step). The eraser outline is so you’ll know just how big or small of an area you have to work with.

Using a sharp, dark pencil (2B is my preferred pencil weight, and in mechanical pencil form), draw your stamp design inside the eraser outlines. It is recommended that for a beginner, use a simple design that has well-defined lines and areas. This will make it easier for you to carve.
In a nutshell, the black pencil lines/areas are the areas you want to retain. The white parts will all be carved out. In this design, I want to outline and retain the coffee cup itself, sleeve, and the steam. I will discard the white heart in the middle and all other white areas.
Go over and darken your pencil lines as needed. You want to make sure the lines are dark enough to transfer well.
II. Transferring your image

When finished, turn the paper over and place it on top of your eraser, making sure to align the pencil outlines with the eraser’s edges (this is why I suggested drawing near the corner of the paper– it’ll be easier to check that everything’s aligned).

Using the blunt end of a pen or a pen cap, apply slight but firm pressure on the paper and rub the drawing over the eraser, in effect transferring the pencil lines. Make sure the paper doesn’t shift when you do this.

Your pencil lines should then be on the eraser; a mirror image of your original drawing. Go over and refine your pencil lines directly on the stamp as needed (sometimes they don’t transfer completely). And yes, I am a nail biter, thanks for noticing! You’re so sweet. And attentive.
III. Define your outlines
This step is optional, but highly recommended, no matter how boring it is and you just want to get straight to carving. Before I start carving, I take my X-acto knife or a box cutter and LIGHTLY trace a shallow cut along the lines or edges of my design. The purpose of doing this is to define my carving areas to make sure I don’t carve beyond that point. If your stamp were a crime scene (murder, obviously), this would be the equivalent of putting up a police line that says “DO NOT CROSS.” I think it’s made a difference in my stamps– my lines have been smoother and cleaner compared to when I just went straight to carving without doing this step.

You need not press into the eraser with your knife; doing so will make the knife dig deep into the eraser which makes it hard for you to maneuver the knife around the eraser, especially if you’re carving curved lines.
IV. Carving!

Finally! The fun part! :D Using your linocutter or your V-tool, very carefully start carving out the areas in your stamp which you don’t need. I like to start at the corners or along an edge. This is when you will notice step III comes in handy. With pre-defined edges, you only need to take out the areas in between the lines you traced earlier using your X-acto knife/box cutter.


Keep carving. Your kitty will be curious as to what you’re doing. Pet her a few times then go back to carving.

When you’ve carved out the details, use the U- tool to discard unwanted areas. The U- tool is great for gouging out larger areas.


V. Check for artifacts

Try out your stamp by pressing it on an ink pad and pressing the stamp evenly on paper. Check the transfer image to remove unwanted areas you might have missed.

Seeing my transfer image, I see now that I missed carving an area in between the steam trails, so I go back and re-carve that area and also refine some of my lines.

VI. Finished stamp!

When you’re satisfied with your transfer image, step back, admire your work (you can trim down the stamp’s edges if you wish, like in the photo above), and do a little dance.
You can leave it as is (the fact that you were able to carve something from an eraser is fulfilling enough) or you can use colored pencils or markers to color or embellish your stamp and use them on letters, gift wrap (repeating patterns!), fabric (use a fabric ink stamp pad), and whatever else you can think of. Here I used colored pens and my stamp to decorate a Kraft notebook cover.

 Used one of my other stamps for this one.
The possibilities are endless, really. Some people have shared their photos of their stamps with me– check out their work:

Din tried out her hand at carving eraser stamps– she started with simple shapes at first (hola, hipster mustache!) then moved on to more complicated stamps soon after. Check out her very clean edges– it’s obvious she started by defining her outlines with an X-acto knife first. (random: wouldn’t it be fun to go through a magazine and stamp mustaches on faces?)

More of Din’s cute stamps. Check out what she did with her palm tree stamp! Sooo awesome!

Mary turned her adorable doodles into even more adorable stamps! How cute is this?! Mary said I could pick which stamp/image I wanted to use for this post, but I ended up using both coz they’re both so cute. Check out more of her work on her Tumblr blog where she sketches sketchy sketches.
Tips for better stamp carving control
1. Carve the smaller, inside details first.
I used to carve out the outside areas of the stamp first, because it was the easiest thing to do. By doing so, though, I had a hard time carving the stamp’s finer lines and details, because the stamp “walls” bent along the direction the cutter was going– it had no support behind/beside it. So do the inner details first, and carve out the larger areas last.
2. Go light.
Do not press too hard on the tools; it’ll be harder to control your lines when your tool tip is buried deep within the carving material. Apply gentle and steady pressure when carving. Make sure your tools are sharp so you don’t need to put as much pressure when carving.
3. Turn the stamp, not the tool.
Try to keep your carving hand (the one you use to hold your knife/tool) still when carving and with your other hand, turn the eraser around your carving tool. This greatly improves the quality of your lines and is especially handy when it comes to curved lines. And, um, it also helps when I don’t breathe too much when I’m at a critical part of the carving process (i.e. fine lines). Hehe.
4. Go slowly.
Don’t be impatient. Eraser stamp carving is actually not as easy nor as quick as it looks ;) But over time, and with practice, it gets easier and you’ll get faster at carving those stamps.
Frequently asked questions
I get asked these questions every so often, mostly from crafters in Manila, so most of my answers will be “localized.”
Q: Where can I buy woodcutting tools?
A: I got mine from National Bookstore in Alabang Town Center. They come in sets of 4, 6, or 8. They used to be hidden in the lower shelves but I’ve seen a lot of them out and displayed on NBS’ shelves recently. Lots of eager eraser stamp crafters looking for them, I suppose ^__^ This is what they look like. I bought this set for a little more than Php 200.

Q: Where can I buy rubber blocks?
A: In Manila? I heard that CraftMNL has some, although I haven’t tried buying from them nor do I know what the brand and quality is like. If you’re open to purchasing online, I would recommend buying the Speedball Speedy Carve blocks from BLICK Art Materials or Amazon. If you’re in the US, I got mine from Michael’s. I also bought a cheap, “generic,” unbranded, gray rubber block from a BLICK store in San Francisco but the quality was meh. Good for practice stamps, I suppose.

Q: Where did you buy your Speedball linoleum cutter?
A: Michael’s, in the US. Locally, I think CraftMNL sells linoleum cutters.
Q: Where can I buy big/jumbo erasers?
A: Japan Home Center, Daiso, or Saizen. They’re not always in stock, though. And the carving quality won’t be as good as the Faber-Castell vinyl erasers. But it’s another option.
Q: Where can I buy colored stamp pads?
A: I’m okay with just using black ink pads (National Bookstore has them) but if you want nicer colors and even metallic ones, Lasting Impression has some (along with lots of other drool-worthy crafty materials). They have a physical store in Greenhills but you can also order online.
Q: Do you do custom stamps? Do you sell stamps?
A: Sorry, no to both questions. I don’t carve my stamps to last (there’s a certain technique for that) and I only carve stamps for myself and for fun. I don’t want to start doing it for other people because I’m primarily an illustrator, not a crafter or a stamp-maker and I don’t want to lose my focus on what I should be doing (illustrating). I don’t sell the stamps I’ve made either, but I am open to giving them away in a future giveaway hahahaha.
Hope this tutorial helped to get you started on carving your own custom eraser stamps, or helped improve your carving :) Check out my other stamp-related posts on this blog and if you have any questions, feel free to drop me a line in the comments. Lastly, this blog is Pinterest-friendly so go ahead and pin the images on this post if you wish!

Happy carving!
Related posts:


